Hiển thị các bài đăng có nhãn database. Hiển thị tất cả bài đăng

Chủ Nhật, 7 tháng 8, 2022

Move large mysql database to new server

We all know the importance of a database in every system, in this article we ask you to back up, move database to another server.

This will be easily handled if your db has a small number of records. And if the number of records is too large (a few million records or more) then exporting on the current machine and importing to another server will take a lot of time, not feasible.

You can use one of two ways:

Method 1:

mysql -u root -p your_db_name < your_path/../database.sql
Example: C:/Users/admin/dumps/backup-2020.sql


Method 2: login with root:

mysql -u root -p –binary-mode=1
use your_db_name
source your_path/../database.sql (C:/Users/admin/dumps/backup-2020.sql)


However, in many cases there will be a dump error, because of the data type, it is not possible to import all the records into the new database.

I assume you are using mysql with Xampp server service, the data when running is saved with the folder name as the database name located C:\xampp\mysql\data\your_db_name, at the new server address, also installed corresponding xampp.

You just need to copy the folder your_db_name, move to the new server, the backup will be successful, together with some log files in mysql, the specific steps are as follows:


move-large-mysql-database-to-new-server

Your path database name


Step 1: Stop Mysql, Apache if you have started the application at the new server.

Step 2: Backup 3 files: ib_logfile0, ib_logfile1, ibdata1 in the new server.

Step 3: In the root server, at address C:\xampp\mysql\data

– Copy the folder your_db_name
– Copy 3 files: ib_logfile0, ib_logfile1, ibdata1
-> Move 1 folder and 3 files above to C:\xampp\mysql\data in the new server.

Step 4: Start MySQL, Apache in the new server.

Step 5: Check the connection to the new DB.

Note: If you want to return to the new server state before backup, you can return 3 files ib_logfile0, ib_logfile1, ibdata1 server to  C:\xampp\mysql\data, you will be able to reconnect with DB (if available before).

Tags: , , , , , , 

Thứ Tư, 20 tháng 7, 2022

Optimize your MySQL Database Performance

MySQL is a free database management system widely used in PHP. When creating tables in MySQL there are many types of Storage Engine to choose from. MyIsam & Innodb & Memory are three popular types. Choosing a store tool is extremely important before you design the database, helping to improve query performance. If the store engine changes later, it will take a long time if the data on the table is large. Let’s talk about it.


optimize-your-mysql-database-performance


I. MySQL storage engines


1. MyISAM

This Storage Engine allows full-text search indexes. Therefore, this Storage Engine gives speed read and search quickly.

The downside of MyISAM is that it uses table-level locking mechanism, so when adding, editing or deleting a certain record in the same table, that table will be locked, not allowed until the previous operation done.


2. InnoDB

Currently InnoDB is set by default when creating DB, it supports Foreign key foreign key and since version 5.6, InnoDB also supports Full-text search indexes.

The best insert / update / delete speed because it works according to Row Level Locking mechanism, so when adding, editing or deleting a table, only the records are manipulated, and other activities on this table are not affect.


3. Memory

Memory engine is the most suitable engine for fast data access, as everything is stored in RAM. And so when restarting MySQL or Server, all data will be deleted.


So we should choose the store engine to suit the purpose of our project:

– MyISAM: For an application with high reading frequency such as news sites, blogs, you should use MyISAM

– InnoDB: For applications with high insert and update frequency such as: Forums, social networks … you should use InnoDB.

– Memory: For tables containing data that has not been stored for too long, and for user sessions, you should use Memory

II. Optimize queries to MySQL Database


1. MySQL insert multiple rows

You cannot run the INSERT statement in a loop, which actually affects the speed of the connection to the database in case your loop has many values.

Let’s use an INSERT statement in this case, for example:

INSERT IN TO USERS (full_name, age, gender) VALUES (‘John’, 20, 1), (‘Sara’, 30, 0), (‘Mary’, 25, 0);


2. MySQL multiple update in one statement

Similar to the multiple INSERT statement, the UPDATE should be optimized when you want to perform the same task.

Please use ON DUPLICATE KEY UPDATE to apply, for example:

INSERT IN TO USERS (id, full_name, age, gender) VALUES (1, ‘John’, 21, 0), (2, ‘Sara’, 31, 0), (3, ‘Mary’, 26, 1) ON DUPLICATE KEY UPDATE full_name=values(full_name), age=values(age), gender=values(gender);

3. Do not use LIMIT OFFSET with tables with large data

For example:

SELECT * FROM TABLE LIMIT 10 OFFSET 80000 (starting at 80001)
OR
SELECT * FROM TABLE LIMIT 80001, 10

Please replace it with:

SELECT * FROM TABLE WHERE id > 80000 LIMIT 10


4. Indexing in MySQL

– How to type index compound vs index:

+ If you frequently query for 2 fields, use composite index (a, b) rather than index (a), index (b). index (a, b) is faster
+ If the query is only 1 field, then just index a without index b

– Each individual field does not need UNIQUE, but when combined as the home address, you can type INDEX as follows:

CREATE UNIQUE INDEX index_street_number_city ON addresses (street, house_number, city);

* Note: You should only index to support the frequently read queries, the frequently used fields. The more indexes, the more it affects inserting, deleting and updating.


5. Use the correct field type for the data

There are many different types of fields available through MySQL, but it’s best to use those that are familiar with strings and numbers.

For example, if you only store the numbers 1, 2, and 3 in a field, better use TINYINT than INTERGER. The storage space on the server will be more saved.


III. Some useful MySQL query commands


1. The most basic thing in a SELECT query

SELECT query is not to use SELECT * if it’s not absolutely necessary.


2. SQL CONCAT Function:

CONCAT function is used to concatenate two or more strings to a single string.

SELECT CustomerID, CONCAT(FirstName, LastName) AS FullName, CONCAT(PostalCode, Town, District, City) AS Address FROM Customers;

Result:

SQL-CONCAT-Function


3. MySQL JOIN Select last record:

SELECT a.id, a.user_id, a.user_name
FROM Customers as a
LEFT JOIN ViewHistories as b ON b.user_id = a.user_id
WHERE b.id = (SELECT MAX(id) FROM ViewHistories WHERE user_id = a.user_id)
ORDER BY a.name

If the user_name includes Japanese(カタカナ), it is possible to ORDER BY condition: ORDER BY user_name collate utf8_unicode_ci


4. Insert record if not exists in table [duplicate]

$db = DB::getInstance();
$user_id = 1001;
$name = ‘John’;
$age = ’26’;
$birthday = ‘1999-01-01’;

$sql = “INSERT INTO users (user_id, name, age, birthday)
SELECT * FROM (SELECT ?, ?, ?, ?) AS tmp
WHERE NOT EXISTS (
SELECT user_id FROM users WHERE user_id = ?
)”;

$run = $db->prepare($sql);
if ($run->execute([$user_id, $name, $age, $birthday, $user_id])) {
// …
// ex: $lastInsertId = $db->lastInsertId();
}
if (!empty($lastInsertId)) {
return ‘This data already exists !’;
}


5. How to delete from multiple tables in one MySQL command?

Use a JOIN in the DELETE statement.

Example: Delete record two table (logs, log_detail) with $id = 1 in logs table

$sql = “DELETE a, b
FROM logs as a
JOIN log_details as b ON b.log_id = a.id
WHERE a.id = $id “;


Thank you for reading the article.


Thứ Tư, 22 tháng 9, 2021

How to import data from excel file, csv into the database and export back

 As you know, database is a very important component in every website, information is stored and manipulated on it. Assuming you need to change or upgrade the database management system, physical memory or data from a 3rd party that wants to import into your database, we have many ways to do, in this article, I will introduce to you. How to import data from excel file, csv into the database and export back.

The following example uses PHP language, MySQL administration system, PHPExcel library. I also attached the sql file for you to easily test, just create a database test, import data structure table and use it immediately.

Requirements: Import the data file and export the master logs table file in MySQL

The summary information is available:

Database name: test
Username: root
Password: ‘123456’
Table name: master_logs
The sql file: master.sql
Test file excel: import.csv, import.xlsx with sheet name is table name (master_logs)

Make sure that you have started the server service, the MySQL database. I assume you have installed and run through XAMPP software, MAMP, etc …

Step 1. We create a connection file to connect to Database

connection.php

It is very simple to understand, with the above connection information, I simply write the value directly like that.

$mysqli = mysqli_connect(‘localhost’, ‘root’, ‘123456’ ,’test’);
$mysqli->set_charset(‘utf8’);
if (mysqli_connect_errno()) {
echo ‘Connect Failed: ‘ . mysqli_connect_error();
exit;
}


Step 2. Create your database and table

Import file master_logs.sql tôi đã đính kèm phía dưới, hoặc bạn chỉ cần tạo bảng master_logs như sau:

CREATE TABLE `master_logs` (
`id` int(11) NOT NULL AUTO_INCREMENT,
`time` datetime DEFAULT NULL,
`operator_id` int(4) DEFAULT NULL,
`content` varchar(200) CHARACTER SET utf8 DEFAULT NULL,
PRIMARY KEY (`id`)
) ENGINE=InnoDB AUTO_INCREMENT=1 DEFAULT CHARSET=utf8;


We have 4 fields: id, time, operator_id, content. Your excel or csv import file needs a corresponding number of columns to be able to insert into your table.


Step 3. The data file to import is xlsx or csv, PHPExcel library

– PHPExcel library in the directory Libs: require(‘Libs/PHPExcel.php’);

– File import.xlsx or import.csv, PHPExcel library that I have prepared (attached below), have the following format:

File import.xlsx or import.csv format

File import.xlsx or import.csv format


1. Import excel, csv files into MySQL

PHP code for data import. The steps are as follows:

– Require the PHPExcel library
– Require file connection
– Validate must import the file to import
– Validate imported files as excel, csv
– Read imported file data. We will read 4 columns data (A, B, C, D) corresponding to 4 data fields in the master_logs table.
– Since the file can have many records, we need to process the data before using an INSERT statement
– After selecting the file and clicking [Import Excel file], it will be successful if the above conditions are met. Please access your database to check.

<?php
require ‘Libs/PHPExcel.php’;
require ‘connection.php’;

// Import
if (isset($_POST[‘btnImport’])) {
$file = $_FILES[‘file’][‘tmp_name’];

if (!empty($file)) {
$csvMimes = array(‘application/vnd.openxmlformats-officedocument.spreadsheetml.sheet’, ‘application/vnd.ms-excel’, ‘application/x-csv’, ‘application/excel’, ‘application/vnd.msexcel’);

if (in_array($_FILES[‘file’][‘type’], $csvMimes)) {
$objReader = PHPExcel_IOFactory::createReaderForFile($file);
$objReader->setLoadSheetsOnly(‘master_logs’);

$objReader->setReadDataOnly(true); // remove empty row

$objExcel = $objReader->load($file);
$sheetData = $objExcel->getActiveSheet()->toArray(‘null’,true,true,true);

$highestRow = $objExcel->setActiveSheetIndex()->getHighestRow();
$value = ”;
$comma = ‘,’;

$i = 1;
for ($row = 2; $row <= $highestRow; $row ++) {
$i ++;
if ($i == $highestRow) { $comma = ”;}
$id = $sheetData[$row][‘A’];
$time = “‘” . $sheetData[$row][‘B’] . “‘”;
$operator_id = $sheetData[$row][‘C’];
$content = “‘”. $sheetData[$row][‘D’] . “‘”;

$value .= “(” . $id . “,” . $time . “,” . $operator_id . “,” . $content . “)” . $comma;
}

// Multi insert query
if (!empty($value)) {
$sql = “INSERT INTO master_logs(id, time, operator_id, content) VALUES $value “;
if ($mysqli->query($sql)) {
echo ‘Inserted!’;
} else {
echo ‘Insert failed!’;
}
}
} else {
echo ‘Please select file excel!’;
}
} else {
echo ‘Please select file !’;
}
}


2. MySQL export to csv file, excel file

The steps are as follows:

– Query data from the master_logs table, of course you can add arbitrary conditions here
– Assign the data field name to the corresponding excel columns (A – ID, B – Time, C – Operator, D – Logs Content), using the setCellValue function
– Continue to use the function setCellValue and while function to set data into the file, in addition to the while function you can use the loop function you like.

// Export
$result = $mysqli->query(“select * from master_logs”);
if (isset($_POST[“exportToExcel”])) {
$objExcel = new PHPExcel;
$objExcel->setActiveSheetIndex(0);
$sheet = $objExcel->getActiveSheet()->setTitle(‘master_logs’);

$rowCount = 1;
$sheet->setCellValue(‘A’.$rowCount,’ID’);
$sheet->setCellValue(‘B’.$rowCount,’Time’);
$sheet->setCellValue(‘C’.$rowCount,’Operator’);
$sheet->setCellValue(‘D’.$rowCount,’Logs Content’);

while ($row = mysqli_fetch_array($result)){
$rowCount++;
$sheet->setCellValue(‘A’.$rowCount,$row[‘id’]);
$sheet->setCellValue(‘B’.$rowCount,$row[‘time’]);
$sheet->setCellValue(‘C’.$rowCount, ($row[‘operator_id’] == 1) ? ‘admin’ : ‘editor’);
$sheet->setCellValue(‘D’.$rowCount,$row[‘content’]);
}

// Export Data to CSV with PHP, when open use format UTF-8
$filename = “fileName” . date(“Y-m-d-H-i-s”) . “.csv”;
header(‘Content-Encoding: UTF-8’);
header(‘Content-type: text/csv; charset=UTF-8’);
header(‘Content-Disposition: attachment;filename=”‘ . $filename . ‘”‘);
header(“Pragma: no-cache”);
header(“Expires: 0”);
header(‘Content-Transfer-Encoding: binary’);

header(‘Content-Type: application/vnd.ms-excel’);
header(‘Cache-Control: max-age=0’);
$objWriter = PHPExcel_IOFactory::createWriter($objExcel, ‘CSV’);
$objWriter->save(‘php://output’);


// Export Data to Excel with PHP
$objWriter = new PHPExcel_Writer_Excel2007($objExcel);
$filename = ‘export.xlsx’;
$objWriter->save($filename);

header(‘Content-Disposition: attachment; filename=”‘ . $filename . ‘”‘);
header(‘Content-Type: application/vnd.openxmlformatsofficedocument.spreadsheetml.sheet’);
header(‘Content-Length: ‘ . filesize($filename));
header(‘Content-Transfer-Encoding: binary’);
header(‘Cache-Control: must-revalidate’);
header(‘Pragma: no-cache’);
readfile($filename);
return;
}


3. HTML

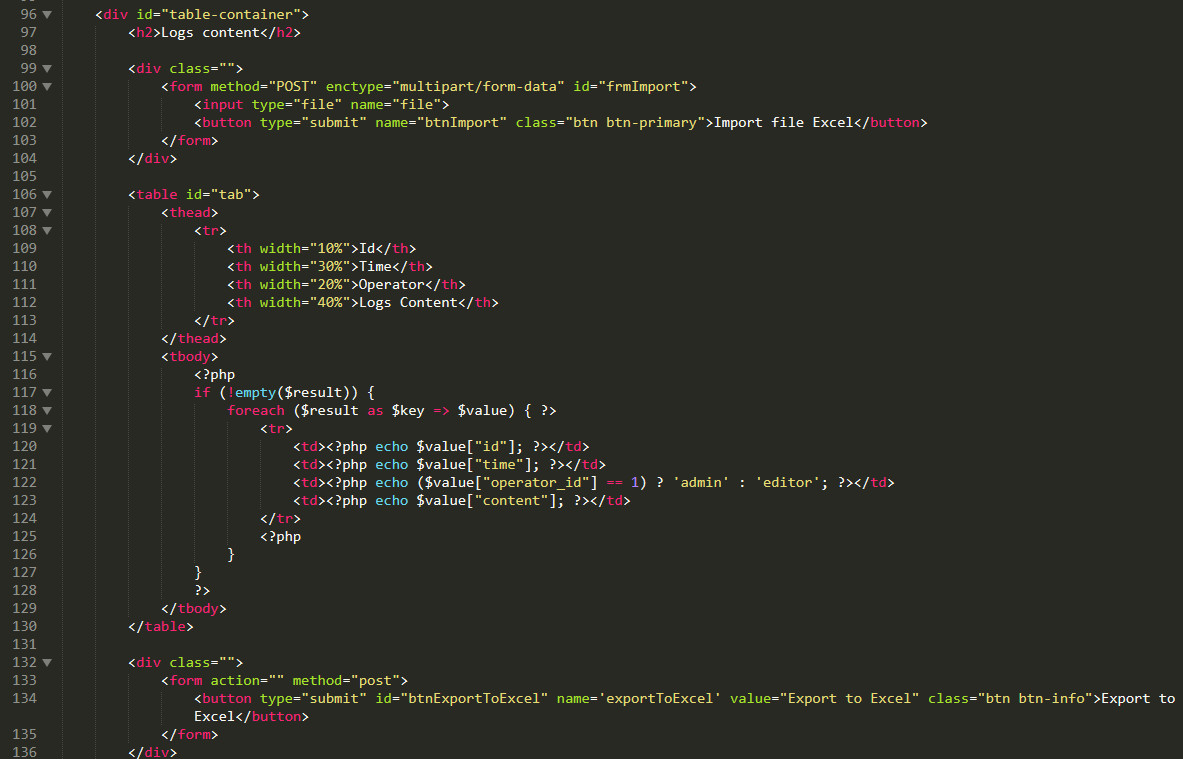
The HTML code is as simple as below (I have attached the HTML code in the file below)

HTML tags

4. CSS

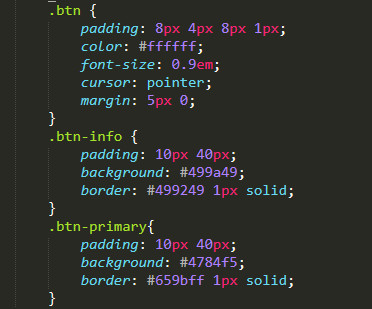
The CSS code is as simple as below.

import-excel-file-css


Conclusion

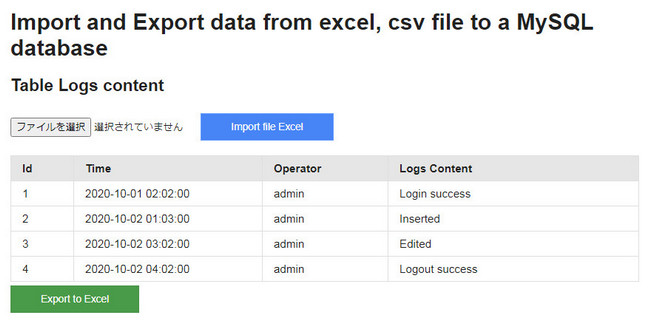
On the main screen, after importing, you will immediately see a list of records retrieved from the Database by combining PHP and MySQL.

– Before import file:

import-export-excel-csv-file-to-a-mysql-database-before_import_file

Before import file


– List of data after importing

import-export-excel-csv-file-to-a-mysql-database

List of data after importing


Download full code: Download Size: 602 KB


Thank you for reading this article.

Tags: , , , , , , , ,