Hiển thị các bài đăng có nhãn php. Hiển thị tất cả bài đăng

Thứ Ba, 12 tháng 10, 2021

How to Sending Emails using PHPMailer

In php there is a mail function that helps you send mail, but this function has many limitations in use, specifically hosting rarely allows you to send mail with this function. To handle sending mail, we can use support libraries such as PHPMailer, Swiftmailer… PHPMailer is a very popular, multi-user mailing library. Here I will guide how to send mail with PHPMailer.

Features of PHPMailer

  • Send mail via SMTP protocol.
  • You can easily use your personal email address or your company email to send it to increase the credibility of the mail.
  • Send mail quickly, less error mail is sent directly to the inbox.
  • Can add cc, bcc, attach files.
  • There is a two-way interaction, which means that when a customer responds to the mail, you will receive the mail in your inbox.

Things to do:

– Have a gmail account

– Download PHPMailer library to use

– Configure and send mail using PHP


1. First you need a gmail account to handle sending and receiving

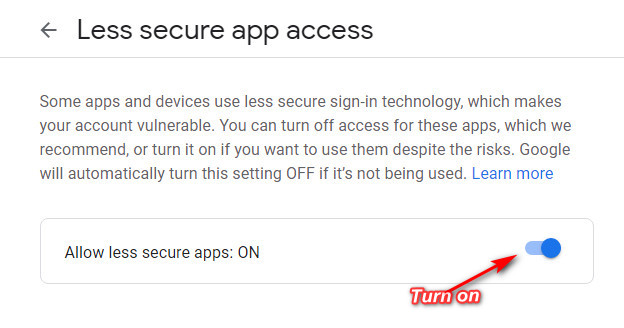
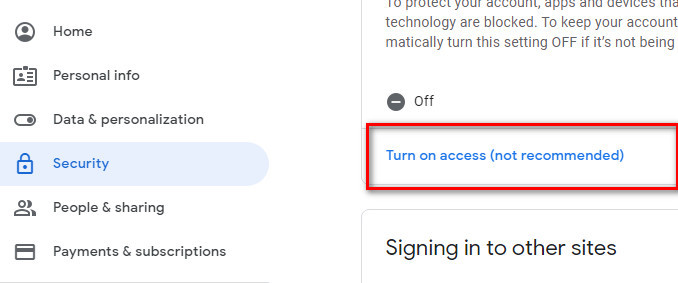
You need to edit the Turn on Less secure app access settings

Manager Google Account -> Security -> Turn on access

Gmail security

Gmail security


Turn on Less secure app access

Turn on Less secure app access


2. PHPMailer library

Download full download code below or PHPMailer library here: https://github.com/PHPMailer/PHPMailer


3. Configure and send mail using PHP

<?php

// PHPMailer require
require_once __DIR__ . ‘/vendor/phpmailer/src/Exception.php’;
require_once __DIR__ . ‘/vendor/phpmailer/src/PHPMailer.php’;
require_once __DIR__ . ‘/vendor/phpmailer/src/SMTP.php’;

use PHPMailer\PHPMailer\PHPMailer;
use PHPMailer\PHPMailer\SMTP;
use PHPMailer\PHPMailer\Exception;

$mail = new PHPMailer(true);

try {
// Server settings
$mail->SMTPDebug = SMTP::DEBUG_SERVER; // detail debug output
$mail->isSMTP();
$mail->Host = ‘smtp.gmail.com’;
$mail->SMTPAuth = true;
$mail->SMTPSecure = PHPMailer::ENCRYPTION_STARTTLS;
$mail->Port = 587;
$mail->CharSet = “utf-8”; // Can read Japanese, Chinese, etc.
$mail->Encoding = “base64”;

$mail->Username = ‘your-email@gmail.com’; // your gmail email
$mail->Password = ‘your-gmail-password’; // your gmail password

// Sender settings
$mail->setFrom(‘your-email@gmail.com’, ‘Sender Name’);

// Recipient lists
$addreddToList = [‘recipient1-email-address’ => ‘Name Recipient 1’, ‘recipient2-email-address’ => ‘Name Recipient 2’, …];
$ccToList = [‘cc1-email-address’ => ‘Name cc1’, ‘cc1-email-address’ => ‘Name cc2’,…];

foreach ($addreddToList as $key => $emailTo) {
$mail->addAddress($key, $emailTo);
}
foreach ($ccToList as $key => $emailTo) {
$mail->AddCC($key, $emailTo);
}

// Setting the email content
$mail->IsHTML(true);
$subject = “Subject”;
$mail->Subject = $subject;

$mail->Body = ‘Body Content <b>bold format</b>….’;
$mail->AltBody = ‘This is the plain text’;

//Attachments
$mail->AddAttachment(‘/path/file.tar.gz’); // Add attachments
$mail->AddAttachment(‘/path/image.jpg’, ‘reservation_file_name.jpg’); // Optional name

// example:
// $attachfile = ‘attach-file-path/fileName.pdf’;
// $mail->AddAttachment($attachfile, ‘reservation_file_name.pdf’);

if ($mail->send()) {
echo “Email message sent.”;
}

} catch (Exception $e) {
echo “Error: {$mail->ErrorInfo}”;
}
?>


Download source code at here: Download code

Tags: , , , , 

Thứ Sáu, 8 tháng 10, 2021

Convert PDF to text file using PHP

If you need to read data from PDF converted to text file using PHP, the following example will solve that problem. It is very simple and concise, easy to do.

This example uses pdfparser library to read text, image files in pdf files. (https://www.pdfparser.org).

1. Install pdfparser library

In your source folder, create a composer.json file with the following content:

{
“require”: {
“smalot/pdfparser”: “*”
}
}

Make sure you have composer installed on your computer, then run the command to install the smalot and pdfparser libraries:

composer update smalot/pdfparser


2. Perform file reading file PDF

2.1 Create form select file, index.php

<form action=’result.php’ method=’post’ target=””>
<label>Select File:</label>
<p>
<input type=’file’ name=’file’ value=”>
</p>
<p><input type=’submit’ name=’submit’ value=’Submit’></p>
</form>

2.2 Export content to read PDF files, result.php

★ All content on one page:

require_once __DIR__.’/vendor/autoload.php’;

if (isset($_POST[‘submit’])) {
// file selected
$file = $_POST[‘file’];

if (empty($file)) {
header(“location:javascript://history.go(-1)”);
}

echo ‘<p>Result contents: </p>’;

$parser = new \Smalot\PdfParser\Parser();
$pdf = $parser->parseFile($file);

// All content on one page
echo ‘<p><b>All content on one page:</b> </p>’;
$text = $pdf->getText();
echo $text;
}


★ Multi page, the content of each page:

    echo ‘<p><b>Multi page: </b></p>’;
// Multi page
$pages = $pdf->getPages();

// Loop over each page to extract text.
foreach ($pages as $key => $page) {
echo ‘<p>Content of Page ‘ . $key . ‘: ‘ . $page->getText() . ‘</p>’;
}


★ Read image:

    // Read image
echo ‘<p><b>All image:</b> </p>’;
$images = $pdf->getObjectsByType(‘XObject’, ‘Image’);

foreach( $images as $image ) {
echo ‘<img src=”data:image/jpg;base64,’. base64_encode($image->getContent()) .'” />’;
}


★ Detail page:

    echo ‘<p><b>Detail page: </b></p>’;
// Retrieve all details from the pdf file.
$details = $pdf->getDetails();

// Loop over each property to extract values (string or array).
foreach ($details as $property => $value) {
if (is_array($value)) {
$value = implode(‘, ‘, $value);
}
echo ‘<p>’ . $property . ‘ => ‘ . $value . ‘</p>’;
}
}


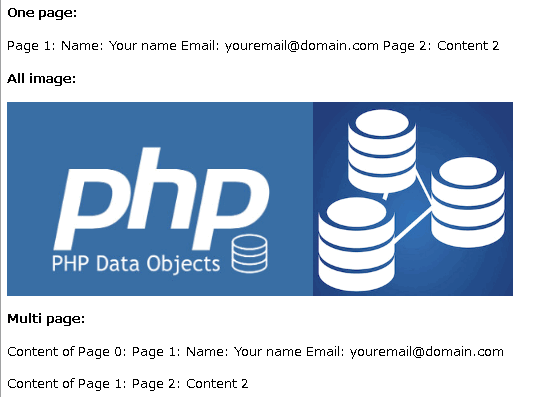
3. Result

Convert PDF to text file using PHP result:


convert-pdf-to-text-file-using-php

Result after convert PDF to text using PHP


★ Conversely, you can refer to how to convert text to PDF using PHP here


Thứ Hai, 4 tháng 10, 2021

Convert HTML form data to PDF file with PHP

PHP is still a very popular language and it is very easy to retrieve data and display lists, so if you need to print the list to A4 paper, you will have to do it.

The following content shows how to use the Mpdf library to print the data to a pdf file, from here you can backup files, print at will.

In your source folder, create a composer.json file with the following content:


{
“require”: {
“mpdf/mpdf”: “^8.0”
// or “mpdf/mpdf”: “*”
}
}

Make sure you have composer installed on your computer, then run the command to install the smalot and pdfparser libraries:

composer update mpdf

We are not going to query from the database but will always retrieve the data as soon as the form is submitted, assuming our data entry form simply has username and email.

Convert HTML form data to PDF file with PHP

The main functions will perform:

– The article uses Bootstrap 4 library:

<link rel=”stylesheet” href=”https://maxcdn.bootstrapcdn.com/bootstrap/4.0.0/css/bootstrap.min.css”>

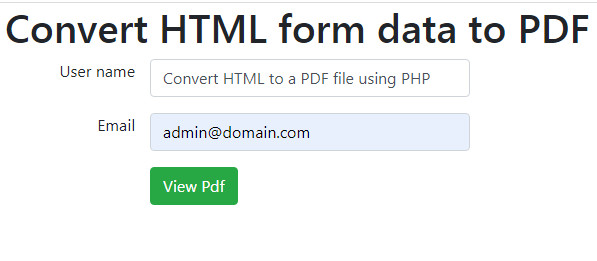
– Form html includes 2 fields: username and email, button submit


convert-HTML-form-data-to-PDF-file-with-PHP-input-element

Form html includes 2 fields: username and email, button submit


– Use PHP to validate input data, email format

– If there are errors, they will be notified via the for loop

<?php
// if errors issset, show it
if (isset($errors)) {
foreach ($errors as $error) { ?>
<?php echo $error; ?>
<?php }
} ?>


convert-HTML-form-data-to-PDF-file-with-PHP-validate

Validate input data, email format


– Mpdf library, with lots of options to match the appropriate output file:
+ Font selection

+ Specifying the paper size

+ Specify the orientation of the paper: L or P

+ Margin layout


– With output file option:

The file will be opened as soon as you click submit, open tab browser

$mpdf->Output(‘demo.pdf’,’I’);
or
$mpdf->Output();

Download file: the file will be downloaded right after clicking submit

$mpdf->Output(‘demo.pdf’,’D’);

The file will be saved to the server as soon as you click submit

$mpdf->Output(“mydata.pdf”,’F’);


The PHP code would look like this:

<?php
/**
* Require
*/
require_once __DIR__.’/vendor/autoload.php’;

if (isset($_POST[‘viewPdf’])) {
// Get element form data
$username = $_POST[‘username’];
$email = $_POST[’email’];

// Validation username is set
if ($username == ”) {
$errors[] = ‘Username is required’;
}

// Check for a valid email address
if (!filter_var($email, FILTER_VALIDATE_EMAIL)) {
$errors[] = ‘Please enter a valid email address’;
}

//if no errors carry on
if (!isset($errors)) {
//create html of the data
ob_start(); ?>

<?php
$mpdf = new \Mpdf\Mpdf([
‘fontdata’ => [
‘ipa’ => [
‘R’ => ‘Sun-ExtA.ttf’
]
],
‘mode’ => ‘en’, // Specify the language to use as English(en), Japanese(ja),…
‘format’ => ‘A4’, // Specifying the paper size
‘orientation’ => ‘L’, // Specify the orientation of the paper: L, P
‘default_font_size’ => 7,
‘margin_left’ => 20, // Left margin
‘margin_right’ => 20, // Right margin
‘margin_top’ => 10, // Top margin
‘margin_bottom’ => 10, // Bottom margin
‘margin_header’ => 10, // Header margin
‘margin_footer’ => 10 // Footer margin
]);

header(‘content-type: text/html; charset=utf-8’);
$body = ob_get_clean();

$mpdf->SetDisplayMode(‘fullwidth’);

$mpdf->setFooter(‘Page {PAGENO} / {nb}’);

$mpdf->SetTitle($title);

$mpdf->WriteHTML($body);

// Open tab browser
$mpdf->Output(‘demo.pdf’,’I’);

// Open tab browser
// $mpdf->Output();

// Download file
// $mpdf->Output(‘demo.pdf’,’D’);

// Save to server
// $mpdf->Output(“mydata.pdf”,’F’);
}
} ?>


– HTML code, enter the form content and show errors if any

<?php
// if errors issset, show it
if (isset($errors)) {
foreach ($errors as $error) { ?>
<?php echo $error; ?>
<?php }
}
?>


convert-HTML-form-data-to-PDF-file-with-PHP-code-html

HTML code


As soon as you click submit button, you will receive the following PDF file’s content:

convert-HTML-form-data-to-PDF-file-with-PHP-pdf-result

PDF file’s content


Important tips:

1. If your data needs to be exported in bulk, an error may occur:

“Fatal error Exception: The HTML code size is larger than pcre.backtrack_limit = 100000”

=> You need to edit it in the php.ini file, for example the following parameters:

“pcre.backtrack_limit = 10000000”


2. If you want to delete blank page at the end of the document:

$blankpage = $mpdf->page + 1;

$mpdf->DeletePages($blankpage);

$mpdf->Output();


3. MPDF: Long text in table td to small size:


convert-html-form-data-to-pdf-file-with-php-table-font-fize


If it is turned off e.g. $mpdf->shrink_tables_to_fit = 0; it is overridden by a specific declaration for a table e.g.:

style=”overflow: wrap”

or

table autosize=”2.4″ …

or

table style=”autosize:2.4;” …

or

table autosize=”1″…


★ You can refer to How to Convert PDF to text file using PHP here


Thứ Tư, 22 tháng 9, 2021

How to import data from excel file, csv into the database and export back

 As you know, database is a very important component in every website, information is stored and manipulated on it. Assuming you need to change or upgrade the database management system, physical memory or data from a 3rd party that wants to import into your database, we have many ways to do, in this article, I will introduce to you. How to import data from excel file, csv into the database and export back.

The following example uses PHP language, MySQL administration system, PHPExcel library. I also attached the sql file for you to easily test, just create a database test, import data structure table and use it immediately.

Requirements: Import the data file and export the master logs table file in MySQL

The summary information is available:

Database name: test
Username: root
Password: ‘123456’
Table name: master_logs
The sql file: master.sql
Test file excel: import.csv, import.xlsx with sheet name is table name (master_logs)

Make sure that you have started the server service, the MySQL database. I assume you have installed and run through XAMPP software, MAMP, etc …

Step 1. We create a connection file to connect to Database

connection.php

It is very simple to understand, with the above connection information, I simply write the value directly like that.

$mysqli = mysqli_connect(‘localhost’, ‘root’, ‘123456’ ,’test’);
$mysqli->set_charset(‘utf8’);
if (mysqli_connect_errno()) {
echo ‘Connect Failed: ‘ . mysqli_connect_error();
exit;
}


Step 2. Create your database and table

Import file master_logs.sql tôi đã đính kèm phía dưới, hoặc bạn chỉ cần tạo bảng master_logs như sau:

CREATE TABLE `master_logs` (
`id` int(11) NOT NULL AUTO_INCREMENT,
`time` datetime DEFAULT NULL,
`operator_id` int(4) DEFAULT NULL,
`content` varchar(200) CHARACTER SET utf8 DEFAULT NULL,
PRIMARY KEY (`id`)
) ENGINE=InnoDB AUTO_INCREMENT=1 DEFAULT CHARSET=utf8;


We have 4 fields: id, time, operator_id, content. Your excel or csv import file needs a corresponding number of columns to be able to insert into your table.


Step 3. The data file to import is xlsx or csv, PHPExcel library

– PHPExcel library in the directory Libs: require(‘Libs/PHPExcel.php’);

– File import.xlsx or import.csv, PHPExcel library that I have prepared (attached below), have the following format:

File import.xlsx or import.csv format

File import.xlsx or import.csv format


1. Import excel, csv files into MySQL

PHP code for data import. The steps are as follows:

– Require the PHPExcel library
– Require file connection
– Validate must import the file to import
– Validate imported files as excel, csv
– Read imported file data. We will read 4 columns data (A, B, C, D) corresponding to 4 data fields in the master_logs table.
– Since the file can have many records, we need to process the data before using an INSERT statement
– After selecting the file and clicking [Import Excel file], it will be successful if the above conditions are met. Please access your database to check.

<?php
require ‘Libs/PHPExcel.php’;
require ‘connection.php’;

// Import
if (isset($_POST[‘btnImport’])) {
$file = $_FILES[‘file’][‘tmp_name’];

if (!empty($file)) {
$csvMimes = array(‘application/vnd.openxmlformats-officedocument.spreadsheetml.sheet’, ‘application/vnd.ms-excel’, ‘application/x-csv’, ‘application/excel’, ‘application/vnd.msexcel’);

if (in_array($_FILES[‘file’][‘type’], $csvMimes)) {
$objReader = PHPExcel_IOFactory::createReaderForFile($file);
$objReader->setLoadSheetsOnly(‘master_logs’);

$objReader->setReadDataOnly(true); // remove empty row

$objExcel = $objReader->load($file);
$sheetData = $objExcel->getActiveSheet()->toArray(‘null’,true,true,true);

$highestRow = $objExcel->setActiveSheetIndex()->getHighestRow();
$value = ”;
$comma = ‘,’;

$i = 1;
for ($row = 2; $row <= $highestRow; $row ++) {
$i ++;
if ($i == $highestRow) { $comma = ”;}
$id = $sheetData[$row][‘A’];
$time = “‘” . $sheetData[$row][‘B’] . “‘”;
$operator_id = $sheetData[$row][‘C’];
$content = “‘”. $sheetData[$row][‘D’] . “‘”;

$value .= “(” . $id . “,” . $time . “,” . $operator_id . “,” . $content . “)” . $comma;
}

// Multi insert query
if (!empty($value)) {
$sql = “INSERT INTO master_logs(id, time, operator_id, content) VALUES $value “;
if ($mysqli->query($sql)) {
echo ‘Inserted!’;
} else {
echo ‘Insert failed!’;
}
}
} else {
echo ‘Please select file excel!’;
}
} else {
echo ‘Please select file !’;
}
}


2. MySQL export to csv file, excel file

The steps are as follows:

– Query data from the master_logs table, of course you can add arbitrary conditions here
– Assign the data field name to the corresponding excel columns (A – ID, B – Time, C – Operator, D – Logs Content), using the setCellValue function
– Continue to use the function setCellValue and while function to set data into the file, in addition to the while function you can use the loop function you like.

// Export
$result = $mysqli->query(“select * from master_logs”);
if (isset($_POST[“exportToExcel”])) {
$objExcel = new PHPExcel;
$objExcel->setActiveSheetIndex(0);
$sheet = $objExcel->getActiveSheet()->setTitle(‘master_logs’);

$rowCount = 1;
$sheet->setCellValue(‘A’.$rowCount,’ID’);
$sheet->setCellValue(‘B’.$rowCount,’Time’);
$sheet->setCellValue(‘C’.$rowCount,’Operator’);
$sheet->setCellValue(‘D’.$rowCount,’Logs Content’);

while ($row = mysqli_fetch_array($result)){
$rowCount++;
$sheet->setCellValue(‘A’.$rowCount,$row[‘id’]);
$sheet->setCellValue(‘B’.$rowCount,$row[‘time’]);
$sheet->setCellValue(‘C’.$rowCount, ($row[‘operator_id’] == 1) ? ‘admin’ : ‘editor’);
$sheet->setCellValue(‘D’.$rowCount,$row[‘content’]);
}

// Export Data to CSV with PHP, when open use format UTF-8
$filename = “fileName” . date(“Y-m-d-H-i-s”) . “.csv”;
header(‘Content-Encoding: UTF-8’);
header(‘Content-type: text/csv; charset=UTF-8’);
header(‘Content-Disposition: attachment;filename=”‘ . $filename . ‘”‘);
header(“Pragma: no-cache”);
header(“Expires: 0”);
header(‘Content-Transfer-Encoding: binary’);

header(‘Content-Type: application/vnd.ms-excel’);
header(‘Cache-Control: max-age=0’);
$objWriter = PHPExcel_IOFactory::createWriter($objExcel, ‘CSV’);
$objWriter->save(‘php://output’);


// Export Data to Excel with PHP
$objWriter = new PHPExcel_Writer_Excel2007($objExcel);
$filename = ‘export.xlsx’;
$objWriter->save($filename);

header(‘Content-Disposition: attachment; filename=”‘ . $filename . ‘”‘);
header(‘Content-Type: application/vnd.openxmlformatsofficedocument.spreadsheetml.sheet’);
header(‘Content-Length: ‘ . filesize($filename));
header(‘Content-Transfer-Encoding: binary’);
header(‘Cache-Control: must-revalidate’);
header(‘Pragma: no-cache’);
readfile($filename);
return;
}


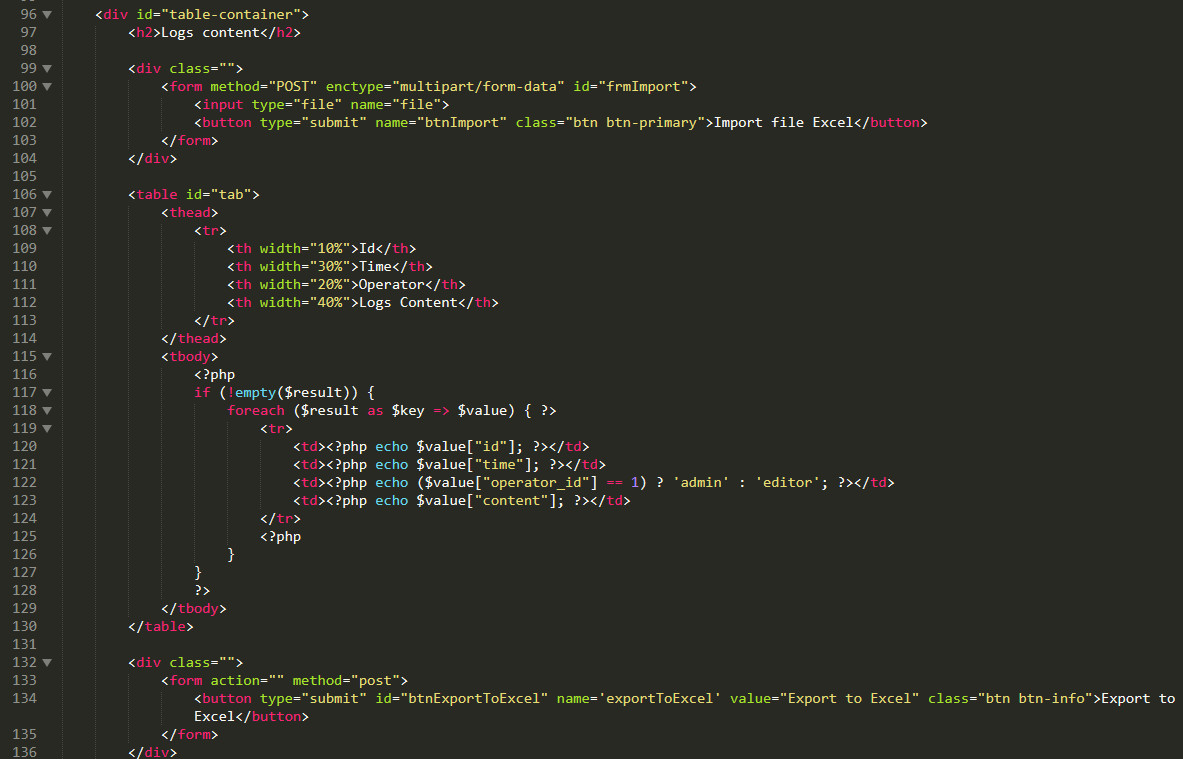
3. HTML

The HTML code is as simple as below (I have attached the HTML code in the file below)

HTML tags

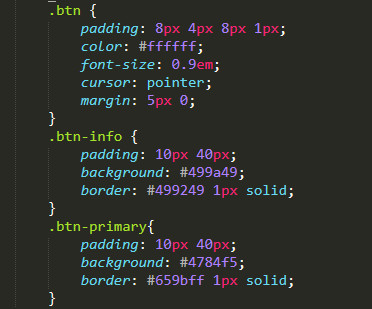
4. CSS

The CSS code is as simple as below.

import-excel-file-css


Conclusion

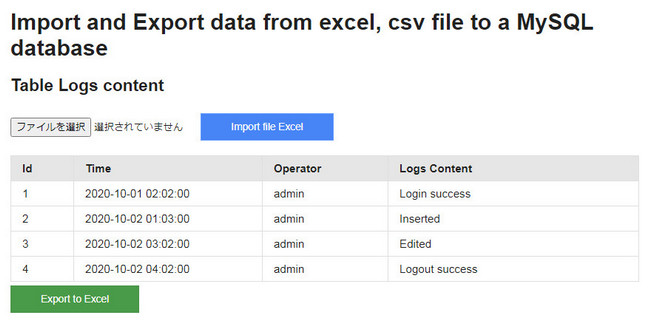
On the main screen, after importing, you will immediately see a list of records retrieved from the Database by combining PHP and MySQL.

– Before import file:

import-export-excel-csv-file-to-a-mysql-database-before_import_file

Before import file


– List of data after importing

import-export-excel-csv-file-to-a-mysql-database

List of data after importing


Download full code: Download Size: 602 KB


Thank you for reading this article.

Tags: , , , , , , , , 

Thứ Ba, 21 tháng 9, 2021

PHP – MVC CRUD and Connect to MySQL using PDO

 Basic knowledge is always very important, in this article I will introduce to you how to use the PHP – MVC model, using PDO to connect to MySQL.

What is PDO? 

It is an acronym for “PHP Data Objects”. Until now, the functions used were divided according to the type of database.

For example:

– When connecting to MySQL, I used to connect with the “mysql_connect” function,
– In the case of PostgreSQL, it was connected with the “pg_connect” function.

There is no problem if the database is fixed, but if you change or port to a different database in the future, you have to rewrite everything.

But if you use the PDO class, the same function can be used regardless of which database is used, so if you change the database in the future, you only need to change the parameters you specified when you created the PDO class (it seems that there are some differences depending on the database…)

Let’s learn how to connect to a database using the PDO class in this article.

We will proceed on the premise of the following conditions:

* PHP is PHP 5.3.6 or higher
* Database is MySQL
* Character encoding is UTF-8



I. Connect to DB with PDO

I assume for example you have a DB with the following information:

Name: YOUR_DB_NAME,
Username: root
Password: 123456
Port: 3306
Table: users (id, first_name, last_name, age)


Create a Class DB and use PDO to connect to your Database as follows. Specifies the character encoding. Note that it is utf8, not UTF-8

Create the connection.php file on your root directory:

connection.php

class DB
{
/**
* Static variable DB Name
*/
public function config()
{
return [
‘db_name’ => ‘YOUR_DB_NAME’,
];
}

/**
* Connect to Database
*/
public static function getInstance()
{
$db = new DB();
$db_name = $db->config()[‘db_name’];

try {
$pdo = new PDO(‘mysql:host=localhost; port=3306; dbname=’ . $db_name, ‘root’, ‘123456’);
$pdo->exec(“SET NAMES ‘utf8′”);
} catch (PDOException $ex) {
$pdo = $ex->getMessage();
}

return $pdo;
}
}

Using the above PDO statement, we were able to connect to the DB successfully.

When executing SQL statements with PDO, the following two types of methods can be used.
– query
– prepare

Next, let’s take a closer look at each method.

In addition, we create Controller, Model, View in turn to get data through PDO

II. Controller, Model, View

1. Create the IndexController.php on /root/controllers folder

controllers/UsersController.php

require_once (‘controllers/BaseController.php’);
require_once (‘models/user.php’);

class UsersController extends BaseController
{
/**
* Construct
*/
public function __construct()
{
$this->folder = ‘users’;

// Call perpage of pagination setting
$this->status_success = 1;
$this->status_error = 0;
$this->per_page = 10;

$this->save_success = ‘Data has been saved successfuly’;
$this->save_error = ‘Data has been saved failed’;
$this->delete_success = ‘Data has been deleted successfuly’;
$this->delete_error = Data has been deleted failed;
}

/**
* Index
*/
public function index()
{
// Set default perpage
$per_page = $this->per_page

[$users, $pagination, $page_total] = User::all($per_page);

$data = [‘users’ => $users, ‘pagination’ => $pagination, ‘per_page’ => $per_page, ‘page_total’ => $page_total];

$this->render(‘index’, $data);
}
}


2. Create the BaseController.php on /root/controllers folder

controllers/BaseController.php

/**
* Base Controller
*/
class BaseController
{
// variable folder name in to access views folder
protected $folder;

/**
* Show result to views
*/
function render($file, $data = array()) {
// Check exist current file
$view_file = ‘views/’ . $this->folder . ‘/’ . $file . ‘.php’;

if (is_file($view_file)) {
// if exist file, create variable and add to call function
extract($data);

// Save data and show with variable to views
ob_start();
require_once($view_file);
$content = ob_get_clean();

// use common template
require_once(‘views/layouts.php’);
} else {
// if file not exist, show error page
header(‘Location: index.php?controller=pages&action=error’);
}
}
}


3. Next, create the file user.php in /root/models folder

models/user.php

/**
* User Model
*/
Class User
{
/**
* List all
*/
public function all($per_page)
{
$db = DB::getInstance();
if (isset($_GET[‘page’])) {
$page = (int)$_GET[‘page’];
} else {
$page = 1;
}

if ($page > 1) {
$start = ($page * $per_page) – $per_page;
} else {
$start = 0;
}

// query get pagination, page_total
$page_num = $db->prepare(“SELECT count(*) FROM users WHERE ‘last_name’ = ? AND age = ?”);
$page_num->execute();
$page_total = $page_num->fetchColumn();
$pagination = ceil($page_total / $per_page);

// query get list data
// your query is select all of them (SELECT * FROM users LIMIT {$start}, $per_page)
// or add conditions with last_name and age value

$last_name = ‘John’;
$age = 20;
$request = $db->prepare(“SELECT * FROM users WHERE ‘last_name’ = ? AND age = ? LIMIT {$start}, $per_page “);

$lists = [];
if ($request->execute([$last_name, $age]) {
foreach ($request->fetchAll() as $item) {
$list = [];
$list[‘first_name’] = $item[‘first_name’];
$list[‘last_name’] = $item[‘last_name’];
$list[‘age’] = $item[‘age’];

$lists[] = $list;
}
}

return [$lists, $pagination, $page_total];
}
}


米 Note: Select method with PDO, you can use one of the two methods below. In the example above I used method 1 for the shorter code

// Pattern 1
$request = $db->prepare(“SELECT * FROM users WHERE ‘last_name’ = ? AND age = ?”);
$request->execute([‘John’, 20]);

// Pattern 2
$request = $dbh->prepare(“SELECT * FROM users WHERE last_name = :last_name AND age = :age”);
$request->bindValue(‘:last_name’, ‘John’);
$request->bindValue(‘:age’, 20, PDO::PARAM_INT);
$request->execute();

4. Next, create the view file in /root/views/users folder
views/users/index.php

    // Display form data in your template
var_dump($users);
echo $patination;
echo $page_total;
?>


5. Create the template layout file in /root/views folder
views/layouts.php

This is very simple layout


6. Finally, we create the index.php and routes.php file in the root directory. Router file to do the navigation.

– index.php

    require_once(‘connection.php’);

if (isset($_GET[‘controller’])) {
$controller = $_GET[‘controller’];
if (isset($_GET[‘action’])) {
$action = $_GET[‘action’];
} else {
$action = ‘index’;
}
} else {
$controller = ‘pages’;
$action = ‘home’;
}

require_once(‘routes.php’);
?>


– routes.php


$controllers = array(
‘users’ => [‘index’, ‘create’, ‘edit’, ‘store’, ‘update’, ‘delete’],
);

if (!array_key_exists($controller, $controllers) || !in_array($action, $controllers[$controller])) {
$controller = ‘pages’;
$action = ‘error’;
}

if (strpos($controller, ‘users’) !== false) {
include_once(‘controllers/’ . $controller . ‘Controller.php’);
}

$class = str_replace(‘_’, ”, ucwords($controller)) . ‘Controller’;
$controller = new $class;
$controller->$action();
?>

So we have completed the basic PHP-MVC model, with the Data Select query using PDO. Next we will implement the insert, update, and delete models. The content will edit into the files we created above.


7. Edit UsersController

In the UsersController.php, add function create, edit, store, update and delete

controllers/UsersController.php

require_once (‘controllers/BaseController.php’);
require_once (‘models/user.php’);

class UsersController extends BaseController
{
/**
* Create view
*/
public function create()
{
// It return add view in views/users/create.php
$this->render(‘add’);
}

/**
* Store Action
*/
public function store()
{
$result = User::store();

if ($result == $this->status_success) {
$_SESSION[‘alert_success’] = $this->save_success;
echo ”;
} else {
$_SESSION[‘alert_danger’] = $this->save_error;
echo ”;
}
}

/**
* Edit view
*/
public function edit()
{
// It return add view in views/users/edit.php
$user = User::find($id);
$data = [‘user’ => $user];
$this->render(‘edit’, $data);
}

/**
* Update Action
*/
public function update()
{
$result = User::update();

if ($result == $this->status_success) {
$_SESSION[‘alert_success’] = $this->save_success;
echo ”;
} else {
$_SESSION[‘alert_danger’] = $this->save_error;
echo ”;
}
}

/**
* Delete Action
*/
public function delete()
{
$result = User::delete();

if ($result == $this->status_success) {
$_SESSION[‘alert_success’] = $this->delete_success;
echo ”;
} else {
$_SESSION[‘alert_danger’] = $this->delete_error;
echo ”;
}
}
}


8. In the model file models/user.php, add function find, store, update, delete

models/user.php

/**
* Find
*/
public function find(int $id)
{
$db = DB::getInstance();
$sql = $db->prepare(“SELECT * FROM users WHERE id = ? “);
$sql->execute([$id]);
$list = [];
if ($item = $sql->fetch()) {
// code …
}

return $list;
}

/**
* Store Action
*/
public function store()
{
try {
$db = DB::getInstance();
// insert to users table
$sql = “INSERT INTO users (first_name, last_name, age) VALUES (?, ?, ?)”;
$row = $db->prepare($sql);

if ($row->execute([$first_name, $last_name, $age])) {
$result = 1; // successful
} else {
$result = 0; // failed
}
} catch (PDOException $ex) {
$result = $ex->getMessage();
}
return $result;
}

/**
* Update Action
*/
public function update()
{
try {
$db = DB::getInstance();
// update to users table
$sql = “UPDATE users SET first_name = ?, last_name = ?, age = ? WHERE id = ?”;
$row = $db->prepare($sql);

if ($row->execute([$first_name, $last_name, $age, $id])) {
$result = 1; // successful
} else {
$result = 0; // failed
}
} catch (PDOException $ex) {
$result = $ex->getMessage();
}
return $result;
}

/**
* Delete Action
*/
public function delete(int $id)
{
try {
$db = DB::getInstance();
// delete to users table
$sql = “DELETE FROM users WHERE id = ?”;
$row = $db->prepare($sql);

if ($row->execute([$id])) {
$result = 1; // successful
} else {
$result = 0; // failed
}
} catch (PDOException $ex) {
$result = $ex->getMessage();
}
return $result;

}


9. In the views/users/ folder 

Create create.php, edit.php and edit index.php

– create.php and edit.php, simple code is below

// Open form

form id=”frmAction” method=”post” action=”index.php?controller=users&action=store” enctype=”multipart/form-data”>

// Input element

// Close form


– index.php
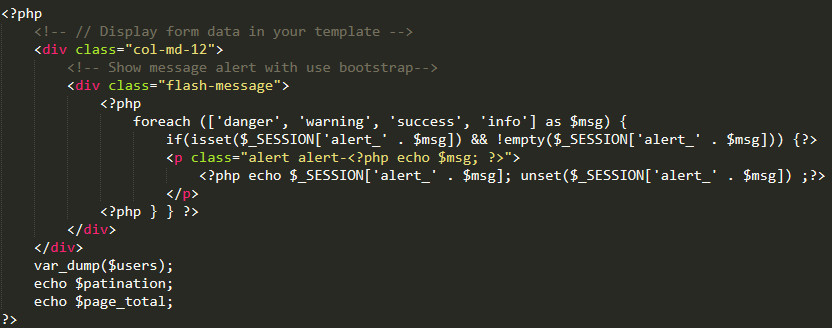
 

III. Conclusion

Our MVC code looks like this:

– controllers
+ UsersController.php
– models
+ user.php
– views
+ users/create.php
+ users/edit.php
+ users/index.php
+ layouts.php
– connection.php
– routes.php


Above is a simple PHP-MVC example, using PDO to manipulate MySQL, PDO also helps you avoid some SQL injection errors. So if you’re not using any PHP framework then giving PDO a try is a great option.

Thank you very much for reading this post.
Tags: , , , ,